Welcome to All in One Bonsa

Bitten by the Bug


Welcome to All in One Bonsai...a blog that aims to remind me of what I have forgotten. Over the years I have been finding out as much as I can about the art of bonsai. I hope the information in this blog will shed some light to the beginning bonsai enthusiast out there.


I saw some bonsai trees at a corner market one night in Taipei and asked the guy if he was willing to teach me how to create these miniature trees. He directed me to a night school where all the instruction was in Chinese. My Chinese ability is very ordinary at the least so although I was learning bits and pieces, I really wasn't getting all I wanted from the course. The best parts were when the teacher would start pruning a beautiful tree or when he showed us how to repot a bonsai. The mystery was still out there but my interest wasn't waning, if anything it fueled my motivation to find out more. And so I did.


Let the adventure begin...


Recently I have discovered the joy of pottery. Bonsai and pottery are close friends so it was only a matter of time before I was introduced to her. Welcome to All in One Bonsai...and pottery.


Feel free to visit my site where you can purchase some of my handmade pottery. Quite a few pieces have been wood fired as it is the prefered method here in Taiwan:


Esty Shop: AllinoneCeramics


Wednesday, 16 April 2014

All Fired Up!

From Ashes to Ashes

Please enjoy some recent additions to my pottery collection.  All these pieces were wood fired in the hills of Yamingshan, Taiwan.  

A Japanese style tea bowl.

Height 8 cm.  Width 11 cm.

I was lucky with how the inside of the bowl turned out.  When wood firing, luck does play a part.

A side look.  Weight 400 grams.

A look at the opposite side of the tea bowl.  This side ended up being a touch shinner.  

Important to make your mark!

I tried to make the bowl as asymmetrical as possible but still be balanced at the same time.

A different angle.

The close up of the colour result.  

An idea of the overall shape looking down.


This side happens to be my favourite.  I like the rough textured look.

Resting.

I decided to make some monks who are also best friends.

For each monk, I gave him my stamp.

The back side of these guys looked like rock.  That was the look I was hoping to achieve for the entire piece.  I wanted to look like these monks were carved out of granite.

Maybe they know something that we do not?  The more I look at this photo it looks like the big fella has been punched in the eye...and he is still happy!

A set of four tea cups.

Individual shots of each tea cup.  Each cup has similiar dimensions and weight.

Height 4 cm.

Width 6.5 cm.

Weight 75 grams.

Tea drinking is so important here in Taiwan.  All the locals seem to have their own tea cups.

Wood ash!

Once cooled these cups are totally safe to drink from.

Pairs of cups waiting to be used.

A quick look at the base.

A small bonsai pot.

Height 4.5 cm.  Width 6.5 cm.  Weight 100 grams.

Three legs.

A close up of the drainage holes and two smaller ones that will be used to secure the tree in the pot.

An oval bonsai pot.  I was pleased with how this one turned out.

A close up of the texture.

After firing, this pot developed a reddish glow in certain parts.

My Chinese name!

Length 15 cm.

Width 12 cm .  Height 2.5cm.  Weight 315 grams.

Another bonsai pot.  I tried to mark the pot to look like old bark.

Width 13.5 cm.

One drainage hole and four small holes which will be useful when securing a tree in this pot with bonsai wire.

Height 6.5 cm.

I would love to see an ancient tree living in this particular pot.  Maybe an old juniper tree?  Their bark tends to have reddish parts.  Nice match.

A view looking straight down.  Weight 400 grams.

The next few are of a flattish pot that would house a nice forest plantation of either maple, juniper or elm.

Maybe put cheese and crackers on it instead?

A view of the complete pot.

A close up of the lip.

Rough and ready.

One drainage hole and four smaller holes.  Length 27 cm.  Width at widest part 17 cm.  Weight 610 grams.

I made an old Japanese water bucket?

I plan to plant some small flowers in this one.

The middle part actually didn't hold during the firing.  It would have been better if it did but I can still use it to good effect.

A small drainage hole.  Height 13 cm.

Looking from above.  Weight 70 grams.

The last one I made is an incense burner.  Length 19 cm.  Width 6 cm.  Height 4.5 cm.  Weight 600 grams.

The idea goes that you put incense in the box and as it burns the smoke will travel out through the holes looking all misty.

The plan was to make this incense box look like old wood that had splintered.

This side didn't close that well.  I was not too happy with how the lid raised up a little during the firing.  I need to work out a solution for this.

Some close ups of the texture.

A smoke hole.

The whole clay incense box looked a little too glossy for me. If it was a touch duller and if the lid was a perfect fit I would have been a happy man. 

Signing off!

Thanks for taking the time to look at some of my new additions that now sit in my home.  I plan to plant trees in the bonsai pots in the future. It is now a matter of finding the perfect tree to compliment the pot or should it be the other way around?  It doesn't matter.  Until next time....

Sunday, 6 April 2014

Repotting a Juniper

A Lazy Sunday Afternoon

After waking up late and then eating eggs and pancakes for breakfast, I decided to repot a juniper that I bought over a year ago.  This juniper has been growing in a clay soil which I know is not the best soil mix for this tree to thrive in.  A clay soil will be cloggy and restrict the healthy growth of roots which in turn effects the growth of the branches and foliage.  

It was time to improve this bonsai by attempting to reshape and repot.  
The tree was grown from a cutting and given some bends and turns.  The wire was left on far too long.

I took the wire off about 6 months ago.  As the tree grows in the future, these marks will diminish.

I use thick wire to add a few more dramatic turns in the base.  I also wire the secondary branches.

I thought the tree was too tall for the size of the trunk so I reduced its height and added a jin.  Dead wood is a feature of junipers.

The clay soil is very compact.

I will remove around two thirds of this soil.  Junipers do not like all their soil being removed.  

I have prepared some new free draining soil.  My soil has very few organic materials.  Organic material will eventually break down and restrict the growth of the roots.

This is a picture of how I pushed up the thick wire when I began wiring the trunk of this tree.  I will push this wire through a drainage hole in its new pot when I eventually secure the tree.

I leave these roots and this much of the original soil.

I prepared the pot with mesh and wire.  Do this right at the start.

Adding the new soil mix.  I make a mound on the left hand side where I want to repot my juniper.  I want it raised slightly higher.  It makes the tree look stronger and more dominant.  

It kind of looked a little off balance, falling away to the right so I found a rock and placed it to the right of the tree.  This re balances the tree and adds a natural feature.

Lastly, I give the tree a healthy watering and place it back on a bench outside.  I also cut up some sphagnum moss which will give the surface roots some moisture.

I hope you are also having a lazy Sunday!

Wednesday, 2 April 2014

In Search of...

Do the Clothes Make the Man?

Learning more about bonsai has guided me to take a greater appreciation of the pot.  This in turn has sparked an interest in pottery more generally.  My girlfriend and I have been learning to make teapots, bonsai pots, and vases for the past year now.  All this has been great fun, especially when you can make something that someone can enjoy.  However, the topic of glazing has been a very confusing one for me.  I believe a nice glaze can really add a touch of class to whatever it is that you made - provided the colour matches your intended image.  I am always searching for a beautiful glaze and have come up short most times...but not today.

Jack, my bonsai teacher drove me to a friend of his for the past 35 years.  He specialises in making bonsai pots and mixing his own glazes together.  Throughout his career Mr. Kao has experimented and experimented to the point where he has developed some fantastic, original glazes.  I was naive enough to ask him how he mixes certain materials together.  He politely refused to tell me.  The next best thing was to ask if I can buy some.  He accepted.  I bought the following glazes from him and hope to add these to some items that I will make in the future.  Please enjoy.

I love the little speckles.  Reminds me of far away galaxies.

Might be nice for a cumquat bonsai tree.

I do like the simple stoney look.

This glaze could be used for almost anything.  

A little bit more razzle and dazzle.

Classy.

Maybe some tea cups?

Vase and flowers would go well.

A small cherry bowl?

A bonsai pot.  A flowering cherry tree living in it.

His workshop out back.
Two bonsai pots that he has just finished making.  

Some more bonsai pots with excellent glazes were scattered around his workshop in boxes.

And more.
So, is it the form or the glaze?  A little of both I would say but a nice glaze goes a long way to making an ordinary piece look better!  I look forward to using some of these glazes and posting their results.

Until next time...keep searching.

Monday, 31 March 2014

Spring Time

Grow Baby Grow!

The rotation of the Earth around the Sun has made Spring Time here in Taiwan possible once again.  It is March 31st and the weather fluctuates between 20 and 30 degrees celsius.

Spring is the beginning of the growing season.  The weather is a welcome relief from cold winter days.  Because I have mostly developing bonsai I am looking forward to some more growth.

The growing season will continue on through until Autumn.  The temperature range for growth is about 5 degrees to 40 degrees, depending on the species.  Growth rate actually ceases when temperatures become too hot.  At 30 degrees, for most tree species, growth rate will slow down.  During the early Autumn, growth rate will actually spike a little before settling back for the late Autumn and Winter periods where the trees will become dormant.

I have been watching my trees grow new buds, leaves, and now new shoots.  It is the best time of the bonsai calendar.  It is a busy time (depending on how many trees you have) but it is gratifying seeing your trees wake up from the Winter period and show real signs of life.

I am yet on another holiday and I plan to buy some more trees this week.  I am in the process of setting up some tables to display my bonsai.  A mate Dave and I, will put these together and then I will take some photos.  Coming soon.

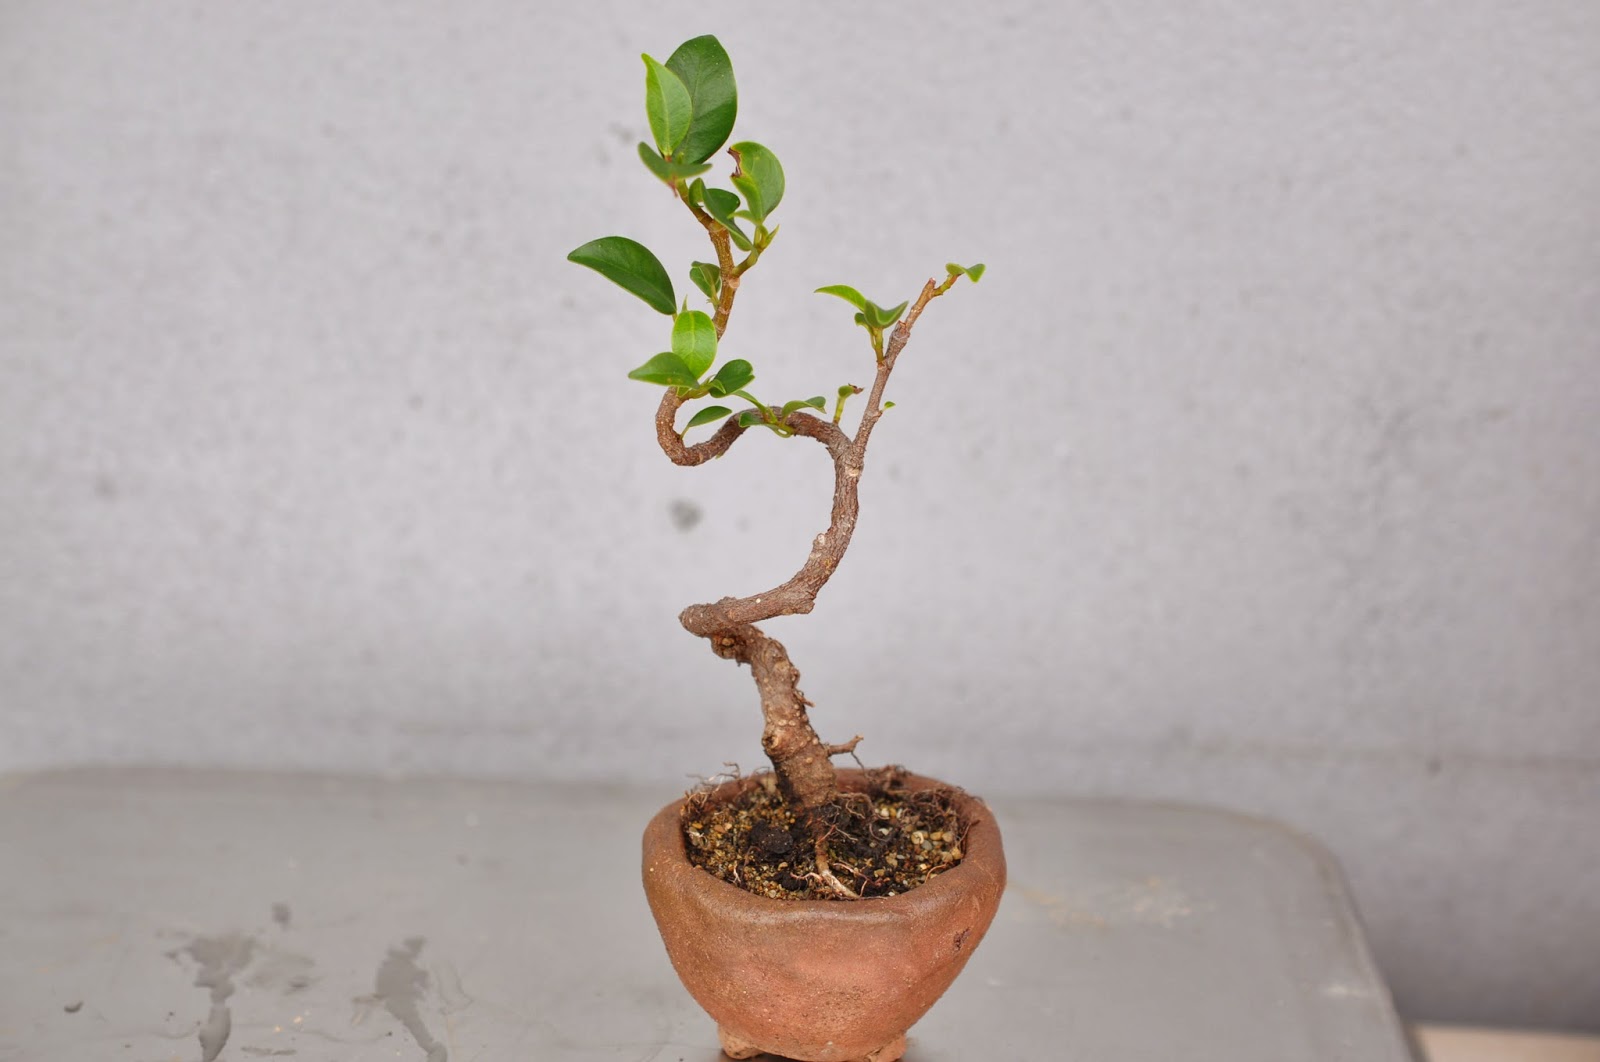
In the meantime I have been doing some pruning, repotting and wiring.  This afternoon I spied a little ficus that was given to me in December.  I decided to rewire this mini bonsai.

You can see that he is only a small guy but he has some character.  Hand build bonsai pot made by the author.

I wasn't that happy with the angle of the apex.  I wanted to take the wire off and reshape it a little different.

I also wanted to bend the base of this tree over a touch more, adding to the illusion of age.

I carefully removed the wire.  You can see that it has held the shape.  It's that S shape from the middle to the top that I want to change.  I will try and add a few slight bends into the trunk to give it more movement.  I also want to redirect that small shoot growing off to the right.  

The old wire was just beginning to bite into the trunk.

I have added some wire and rearranged the basic shape of this ficus.  I used thicker wire from the base up until the branch on the right.  I then used a smaller piece and wired the branch and apex using the one piece.
For the thicker piece of wire I poked it up through the drainage hole and hooked the end of it to the base of the pot.  I prefer doing this as opposed to sticking it in the soil. 


I then placed him back on a wet tray of gravel.  The gravel supplies these tiny guys with a nice level of humidity, which is essential for smaller bonsai.  
Hopefully in the future, this ficus grows some more foliage and shoots that will make this tree look more adult like.