One Can Become Many
Air layering a bonsai tree is a technique that you can use to create 'new' trees from the parent tree in a relatively short period of time. I must admit, when I was first learning about bonsai, I had no idea that you could do this! I have tried a few since that time and am amazed by how well it works. Below is one example of a tree that I did air layer. It is a Taiwan maple. Below is the story. I hope this post will demonstrate how to perform this bonsai technique and encourage you to try it out for yourself.
 |
I bought this Taiwan maple at the local flower market in Taipei. I actually forget exactly when I bought it but I know I didn't do anything with it for quite a while. I initially shortnened both trunk lines to begin activating some more side branches further down the tree. (If you cut a branch most tree species will fight to survive and begin budding branches further down the trunk). It is a great way to reduce the size of your tree while creating new branches - WIN, WIN. This photo was taken on March 8th 2015.
I bought this tree manly because I liked the strong base. I tried to think about how to use the forked branches. The extension of the trunk on the left was too straight - boring. The second possible trunk line was the right branch. I could have kept that and completely cut off the left trunk line. That would have worked ok. However, in the end I wanted to gain more experience in air layering. I was going to create 'new' trees from both of these trunk lines, while also improving the parent tree. Three trees for the price of one! |
 |
| Here we go. I began this work on March 8th 2015, which is close to the beginning of Spring here in Taiwan. The first task is to decide where you want the base of each new tree. I thought right about here would do. You then remove a strip of bark off the tree about the thickness of the branch. Try and clean it up as best you can. If you leave this raw section a little wooly, then the tree will fight to survive and may repair itself without growing new roots. Remove the cambium and get to the heart wood. |
 |
| That's right! You want this ringed section to grow new roots! Crazy. It can be done though. |
 |
| I have marked an arrow where the new roots will eventually grow from. The black line indicates where I will sever the branch from the main tree after the roots have taken. |
 |
To have roots grow from that position however, you need to create a moist environment. Sphagnum moss is the key - along with some plastic wrap. Wet your sphagnum moss in a tray, cut it up into smaller shreds, and wrap it reasonably tightly around the cut section. Some people mix some root growth liquid while wetting their moss but I didn't. Maples are a variety that sprout roots quite easily. If you try this with another deciduous tree maybe it wouldn't hurt.
I used bonsai wire to secure the plastic wrap around the tree. Try and leave a little opening at the top for water to come through.
A close up. Not too difficult right! |
 |
February 7th, 2016.
I left it for about a year - 11 months to be more accurate. This is a long time for most people doing an air layer but I was in no rush and I really wanted to be confident I had roots to work with.
Now we have lots of branches shooting up. This is a great thing! When we remove the air layer we will have many options for a new leader that will form a nice taper to the tree. |
 |
| I removed the plastic wrap and was happy to see healthy roots emerge. |
 |
| I have already severed the other one. I have drawn a black arrow to show you the new lead branch. This small branch will be the main tree's new apex. This way you can create taper. A dramatic taper that will shorten the main tree, creating a more powerful bonsai. |
 |
This is the right branch after I cut it off. I left all the moss around the roots and repotted it in new free draining soil.
Here is the little guy. It was a little tricky securing the tree in the pot but we managed. I think there may be a technique where you can use chopsticks? I need to find out more.
This is the left branch from the main tree. A challenging little sucker!
|
 |
| Here we have the main tree - the real reason I bought this tree! I hope one day this tree will become a very nice bonsai. It definitely has an interesting base. Now I repot this little beast. |
 |
| I have cut the soil and roots in half. Where I have numbered 1, is the cleaned up scar after cutting the air layered branch off. Numbers 2 and 3 are nobly areas that I want to cut into and remove. I decide this will be the front of the tree. The tree slightly inclines towards the viewer. |
 |
You can bare root maples. This means you can totally remove all old dirt from the roots and wash them clean! (Never do this with a juniper or pine). I cut away some thick roots and leave the fine ones to suck up all the water. I will repot again in about 2 years. When I do I will remove some of the other thicker roots, especially if they are above other roots. The ones that are a nice size and are positioned further down the trunk, I will cut in half to create root taper. You do want strong roots showing at the base of your trees. It adds age and strength.
And we are in! What I am hopeful of now, is a lot of side branches budding back. I'm not sure how many I'll get but 3 or four would be nice.
|
 |
| 3 trees! Now we place the trees in semi shade, water well, and encourage lots of roots to grow! I will not fertilize for at least a few months. Fertilizing now may burn the new baby roots trying to grow beneath the soil. |
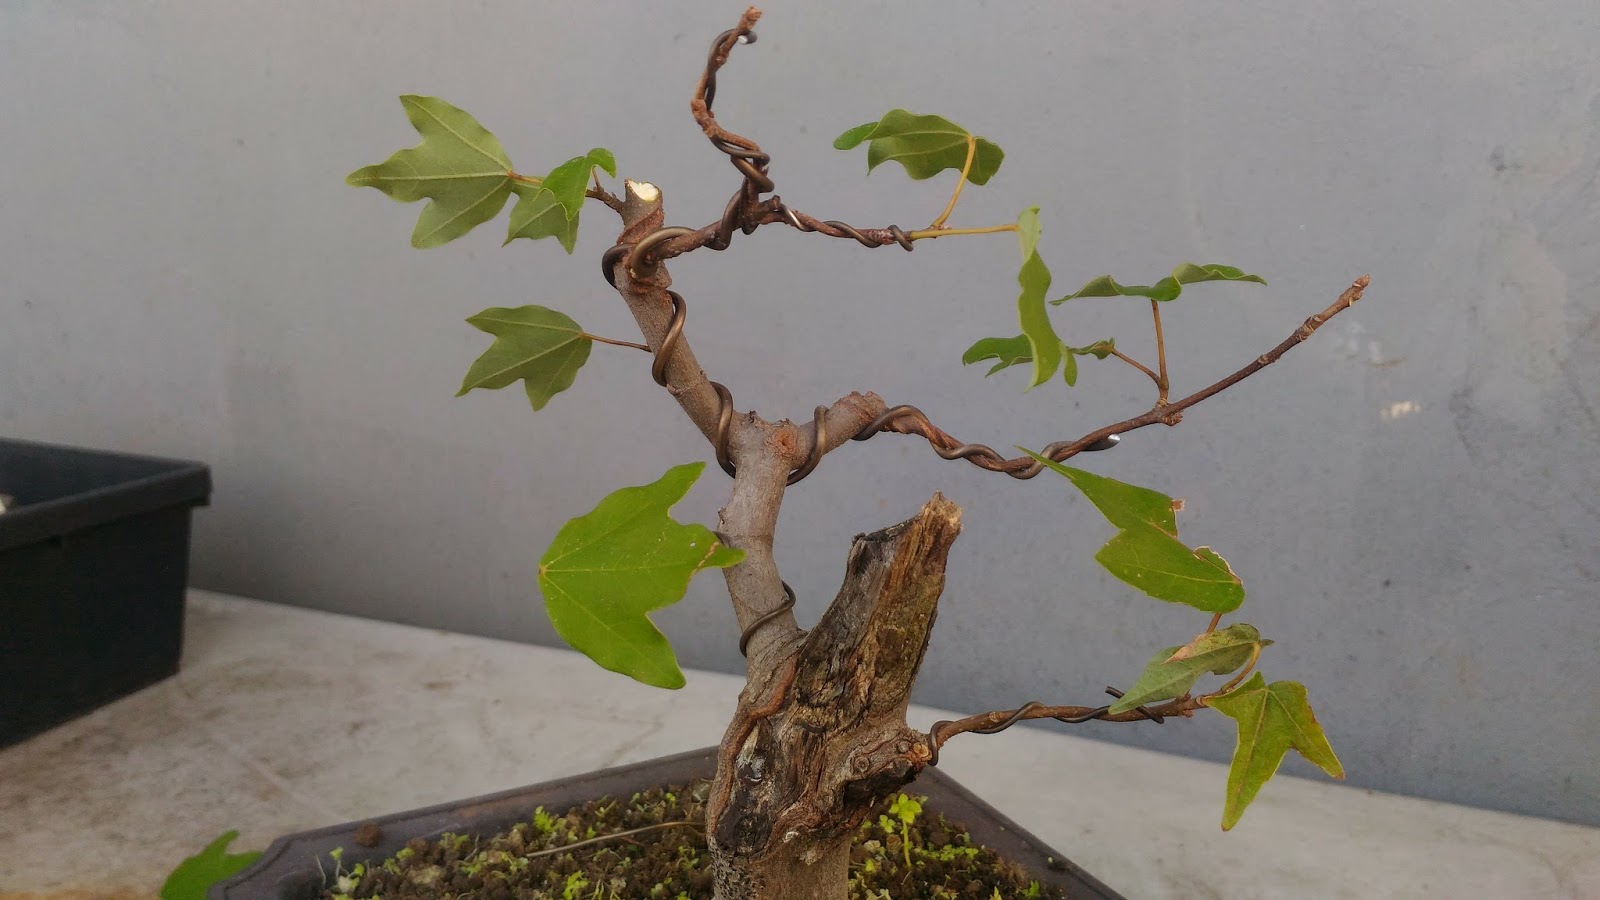
August 25th, 2017
 |
| This is the air layered tree a year and a half later. I let it settle and grow. I wired a few branches during that time to create some movement in them. |
 |
| I now want to work on the tree's new design a little. I want to cut some unwanted branches. I want to remove thicker ones and leave thinner ones. |
 |
| Can you tell which one I removed? I cut it because it made the tree look too juvenile. I possibly could have reduced the length by trimming it about an inch from the juncture but I decided to remove it altogether. I think when you are cutting and designing your tree consider the future growth for a moment and then just decide. If you are still unsure leave it and look at it the next day. That is some advice I received from a bonsai grower here in Taiwan. It is simple advice, but try it and you will be amazed how you see things that you missed the day before. |
 |
| A possible new leader. I ended up wiring the other branch as the leader that you see in the distance. |
 |
| Well, here he is for the time being. I will let the tree rest and recover for a while. Again I hope to get some new side branches growing that will add more ramification to this little guy. |
 |
| The second tree was a lot harder. I removed some branches to see what we had. |
 |
| You can see that I tried to make a new leader a while back by cutting off the ugly flat section - I angled the cut so it would look a little more natural. I think with time it will. Wasn't really sure what to do with that section growing up from the left of the trunk. |
 |
| I cut it! I think I made a mistake. Looking now, I would have left that second truck. I could have had a twin trunk bonsai. Never mind. We will see what becomes of this one. I probably should have used that sound advice I mention previously! |
 |
| September 9th, 2017 - Only about 2 weeks later we see shoots extend. |
 |
| These new shoots can result in new branches. The hope is that new shoots grow in desirable positions. |
 |
| A close up of a new branch growing . Tree will push to survive. By removing some longer, top growing branches, new smaller branches can grow. |
 |
| And the mother tree doing well. A year and 6 months later. We had two side branches grow which was nice. On the left of this tree, I have left a branch growing upwards - can you see it? I will leave this for a while because it is helping the side branch get thicker. That first left side branch is still a little too thin compared to the thickness of the trunk. We call the upward growing branch a sacrificial branch. |
 |
| 2 weeks later - September 25th, 2017 |
 |
| More branches growing adding to the age of the tree. |
 |
September 25th, 2017
No one ever said bonsai is a fast man's game, however, air layering is one way to speed up the process. I probably could have done it quicker than 2 and a half years but I wasn't in a hurry and wanted to get it right. These trees are on their way. Give air layering a try - do it during Spring when the roots will grow quicker. Don't be afraid to buy big bulky trees and then air layer as many branches as you can! Remember One can become Many.
Take care out there.
|